Golang BDD入门: Ginkgo和Gomega实现(2)

Preface
接上篇, BDD解决的问题及与TDD的区别; 以及Given-When-Then语法.
继续看如何用ginkgo框架实现Behaviour Test.
初识Ginkgo
ginkgo, github上3800+ stars, 是最流行的BDD框架.
回顾上篇的购物车例子,先直观感受ginkgo测试代码:
初始状态购物车为空(Given)
当添加1个商品A时(When)
购物车商品列表个数为1 (Then)
购物车商品列表不重复商品个数为1 (Then)
购物车总价显示A的价格 (Then)
当添加1个商品A, 2个B时(When)
购物车商品个数为3 (Then)
购物车商品列表不重复商品个数为2 (Then)
购物车总价显示价格A+2*B(Then)
1 | var _ = Describe("GinkoCart", func() { |
Test code可读性很高: key word和annotation可以与自然语言一一转换.
ginkgo与Javascript BDD框架高度相似, 可见两者关键词几乎完全一致:
1 | describe("A spec", function() { |
Ginkgo的document是很好的start up guide.
第一个Ginkgo例子
Ginkgo依托于golang原生testing框架, 即可用go test ./...运行, 也可通过ginkgo binary(安装go install github.com/onsi/ginkgo). 封装了ginko测试框架的各种feature, 实际中我用的很少, 仅用来初始化测试代码.
本节通过简单购物车例子了解如何写BDD测试代码, 完整的例子代码在github
初始化
首先进入待测试package:
1 | cd code_4_blog/ginkgo_cart |
初始化
1 | ginkgo bootstrap |
生成以suite_test.go文件, 将ginko嵌入testing, 用go test ./...可运行Ginkgo测试代码.
以上生成了新test suite, 接下来向suite添加测试specs, 生成ginkgo_cart package测试文件
1 | ginkgo generate ginkgo_cart |
运行
生成ginko_cart_test.go, 注意测试文件在ginko_cart_testpackage, 需import packageginko_cart. 目的是: BDD层级高于Unit test, 不应了解package内部实现, 测试package外部接口即可.
编写测试代码,运行: go test ./...,

Ginkgo关键词
Ginkgo测试代码骨架由一系列关键词关联的闭包组成, 常用key word有
- Describe/Context/When: 测试逻辑块
- BeforeEach/AfterEach/JustBeforeEach/JustAfterEach: 初始化测试用例块
- It: 单一Spec, 测试case
Key word的声明均为传入body函数, 如Describe
1 | Describe(text string, body func()) bool |
Sample代码片段: 以分析执行顺序
1 | var _ = Describe("Nest Test Demo", func() { |
Describe, Context, When
三者被称为Container: 对Ginkgo均属同类节, 仅名称不一样.
一般Describe用于最顶层: 描述完整的测试场景; 包含Context/When, Context/When本身可以嵌套包含下级Context/When.
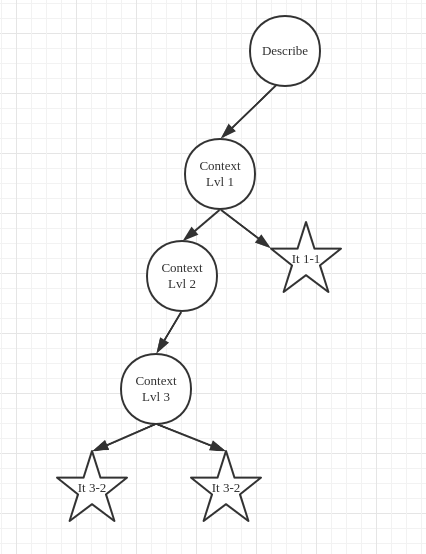
Describe, Context, When组织成Tree结构: Describe是root, Context和When是普通TreeNode.
三者可以包含的节点,除了自身,还包括其他Key word节点: BeforeEach, JustBeforeEach, It.
测试代码逻辑应包裹在BeforeEach, JustBeforeEach, It中,不应直接在Container node实现.
It
Ginko执行以It的基本单元: 以定义的顺序执行(It数即为Ginkgo中的Spec数). 示例定义三个It node, 处于不同层次. 执行顺序为: It 1-1, It 3-1, It 3-2.
It一般包含Assertion逻辑: Exect(...), 即最终的测试结果和预期的比较.
测试执行逻辑实现于BeforeEach, JustBeforeEach中.
BeforeEach, JustBeforeEach
BeforeEach声明于Container节点内部, container node每个child执行前都会执行BeforeEach. 一般用来Setup test env: 声明测试用变量, 初始化
JustBeforeEach很类似, 区别是永远执行于BeforeEach之后: 等从root到It node所有BeforeEach执行完;才再从root到It node执行所有JustBeforeEach; 一般实现测试执行逻辑: 如request HTTP, 添加商品到购物车. 总之是得出输出,以便It node与expect比较.
Demo code 分析
示例各种节点内部组成为Tree:

运行示例得到输出:
1 | beforeEach level 1 |
可见:
- 是以各
Itnode定义顺序执行 - 每个
It执行前,走了从root到It的path: 顺序执行各context node的BeforeEach函数
为什么是层次结构呢? BeforeEach实现本层Context environment setup, 本层测试逻辑出现分支: 有了Context子节点, 次层的BeforeEach定制次层的environment, 并再次分支: 再继续延伸出子Context…
It 与Matcher
购物车demo中: 其中一个It
1 | Expect(cart.TotalItems()).To(Equal(3)) |
这种自然语言风格的assertion是由Ginkgo配套的Gomega实现的: expect返回封装了测试输出值的Assertion:
1 | func Expect(actual interface{}, extra ...interface{}) Assertion |
Assertion是interface, 简化版本(为语义通顺,还包含几个类似function):
1 | type Assertion interface { |
To接收GomegaMatcher, 其封装了Expect value: Equal调用了Ginkgo的EqualMatcher.
1 | func Equal(expected interface{}) types.GomegaMatcher { |
加上Assertion封装了实际value, 两者的比较可得出结论.而ToNot是To的相反情况.
如果想比较自定义的复杂类型: 可实现GomegaMatcher:
1 | type GomegaMatcher interface { |
其他常用Feature
Focus:
仅执行特定Node及之下的It: 在keyword之前加F: FContext, FIt, 但会使go testfail(返回 1), CI集成Ginkgo需注意.
Pending
与Focus相反: 不执行特定Node及之下的It. 在keyword之前加X.但默认不会使go test fail(若想让其fail, 加 –failOnPending)
Skip:
根据代码runtime结果决定是否跳过某It(Pending是编译时):
1 | It("spec 1-1 in level1", func(){ |
Skip仅能置于It之下,否则会Panic.
Eventually
测试异步逻辑: 如发送请求到队列, 需持续polling. 在Gomega实现:
1 | Eventually(func() []int { |
TIMTOUT为总超时时间, 默认1s;POLLING_INTERVAL为每次polling间隔, 默认10ms.
Ginkgo还支持benchmark及run in parallel, 可参考Ginkgo doc
祝大家BDD愉快!